7 Steps to Start Manufacturing Your Product
Executive Summary
This 2026 guide lays out a practical, step-by-step path from validated prototype to reliable production — without quote-first traps.
TL;DR
Start with a design for manufacturability review (DFM), not only quotes.
Protect IP by choosing the right method for manufacturing.
Plan tooling with mold-flow and run a pilot batch before scale.
Bake QA in-process; maintain a QC standard with acceptance criteria.
Lock certifications early (FCC/CE/UKCA) and plan logistics/3PL.
Expect MOQs around 500–1000 for many electronics.
Why 2026 will be different
Supply volatility has eased since 2023, but most failures still occur at tooling and early runs.
Teams who win invest in DFM first, protect IP by splitting critical components, validate with pilots, and treat QA/QC as an operating system—not a final gate.
Key definitions & benchmarks
DFM: design for manufacturing; structured review to make designs tool- and assembly-ready (draft, wall, tolerances, fixtures).
CCM: Component Control Method – Morpho’s unique method of component-level sourcing + direct-buy for critical parts; controlled assembly to protect IP and stabilize yield.
T1 → Pilot → Pre-MP: first shots → controlled batch → near-final run.
QA vs QC: quality assurance vs. quaity control; prevention during production vs conformance checks (FAI/AQL).
MOQ reality: many electronics stabilize around 500–1000 units for viable pricing.
The 7 Steps
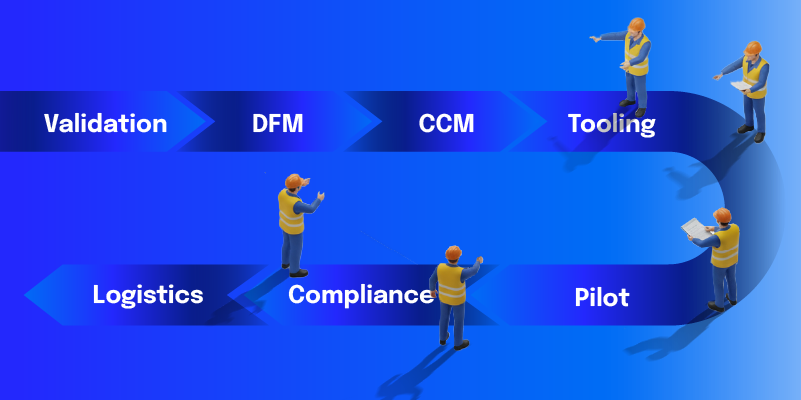
Here’s the high-level sequence we’ll unpack:
Step 1 — Validate demand & use-case
Readiness check: One-pager approved, must-have features locked, success metric defined.
Nokia dominated the early 2000s with rugged, feature‑packed phones: infrared, FM radios, removable batteries, dozens of models. Apple launched the iPhone with fewer hardware features, but with focus: a clean interface, manufacturable hardware, and a software ecosystem that compounded.
Guess who won the next decade?
If you’re a founder, this is the easiest trap: trying to build the “Nokia phone” version of your product on v1. It’s tempting to add one more feature, one more sensor, one more moving part. That path bloats cost, stretches timelines, increases DFM risk, and complicates testing and supply.
Instead, start with the absolute must‑haves for your customer. Version one should prove the core value, survive shipping, pass basic compliance, and be buildable at the intended MOQ.
If you can’t fit it on a one‑page spec, you don’t have a product, just a wish list. Boil it down.
The point isn’t to win spec sheets. It’s to get a reliable, manufacturable product into paying customers’ hands so you can learn and iterate. That takes discipline and restraint.
So step one is not “get quotes.” Step one is deciding what you’re actually building and what you’re not. Clarify your use‑case, your priority (quality, price, or time), and your real constraints. Then commit.
Step 2 — DFM teardown (manufacturability review)
Readiness check: CAD updated (draft/Wall/tolerances), DFM issues resolved, EBOM + MBOM complete, target cost & markets set.
Ever received a product with a big instruction manual? Chances are, you never got around to reading it and using the product the way it was intended. Most founders treat manufacturing like that manual — they think they can read it later. You can’t.
Manufacturing is not just “send a CAD file and get a quote.” The CAD is the beginning of the conversation, not the end.
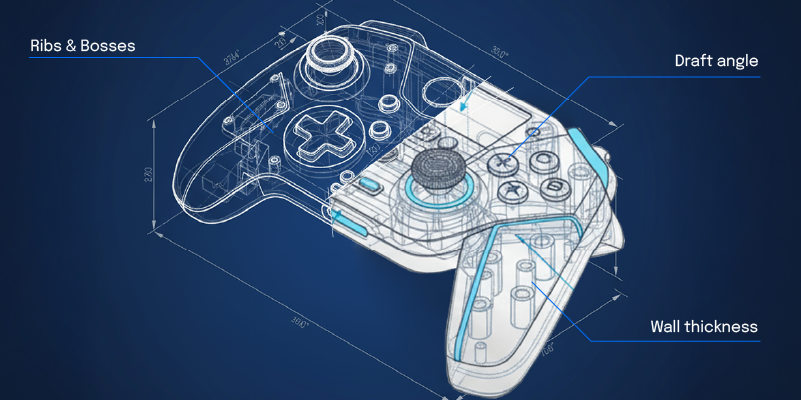
Before you talk price, you need to talk manufacturability, which means draft angles, wall thickness, bosses and ribs, tolerance stack-up, weld lines, gate locations, and assembly sequence.
That’s what a DFM (Design for Manufacturability) review is about.
DFM is where we break your design and rebuild it to survive tooling, molding, manufacturing, assembly, packaging, and shipping.
You don’t want the first time reality hits to be after you’ve cut steel. Fixing mistakes in CAD is cheap. Fixing them in hardened steel is expensive.
If your approach is “we’ll fix it in production,” that’s not a plan; that’s a prayer. The right plan is: pressure-test the design, make the changes, then and only then talk quotes and tooling.
EBOM vs MBOM: lock both before quotes
A Bill of Materials, is usually split into 2 categories, An Engineering Bill of Materials (EBOM) and a Manufacturing Bill of Materials (MBOM).
The EBOM is needed for the design and engineering teams to build and test the product prototype and helps you:
Make better decisions during the process of designing your product and deciding how each part fits in harmony with other parts of your product.
Make the path easier in the long run for manufacturers to source parts, run tests, ramp up tools for production runs, etc
An EBOM is extremely helpful when you want to create an initial prototype and conducting any research regarding your initial product design. Once you’ve gone through this initial phase of developing an EBOM for your product, you can move on to the MBOM.
An accurate EBOM makes the manufacturing process much smoother and helps you communicate to your manufacturer about the minor aspects and small changes needed in your product’s design and components, save time and money on revisions as well as logistics.
So, what’s an EBOM and a MBOM?
The engineering bill of materials describes every item involved in the initial product design including: the parts, models, sketches, illustrations, prototypes, components and the designs you need for your product.
This list helps engineers coordinate their effort to build and test the product and create the kind of product design that suits your market and customer.
The MBOM (Manufacturing Bill of Materials) on the other hand contains a complete list of the items required to build an actual finished product. It also includes packaging materials and other items required to ship your product to the customer. It contains information about the parts (components) that are assembled after procurement, along with other finished goods.
An MBOM is very important because it is exactly what the manufacturing team and production managers refer to while assembling, designing and building your product.
You see, a lot of teams prefer to go first with a packaged MBOM or create a prototype before working out the entire EBOM first.
This not only increases the time and the resources needed to manufacture the product, it makes it a pain for the design and manufacturing teams to stay accountable along the way.
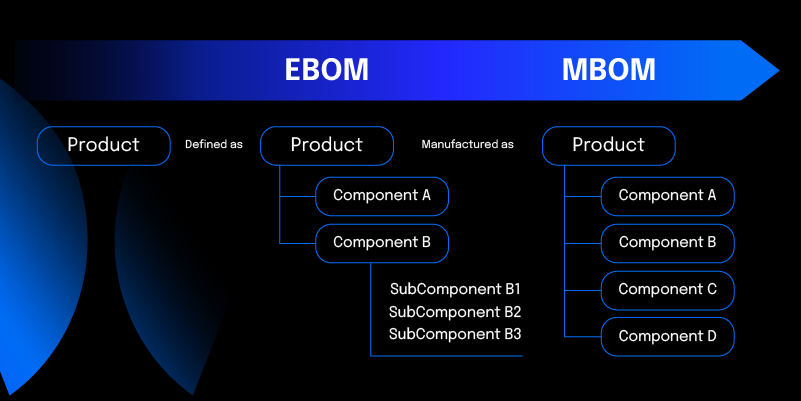
Engineering BOM feeding Manufacturing BOM with packaging, tests, and inspection points.
This is where the difference between the EBOM and MBOM becomes important.
The EBOM decides how your product should be engineered, placed in the market as well as how you should structure the design and the features involved in it. The MBOM helps the production team manufacture your product, by using the EBOM as a guide.
In short, EBOM feeds MBOM.
It should be clear by now that both are crucial in ensuring your product is manufactured to perfection.
A short EBOM or a weak MBOM unnecessarily increases your cost and manufacturing times as well as adds a lot of confusion with suppliers.
A complete EBOM and MBOM ensures everyone does their job properly and safely with little to no confusion.
So, what should be in your EBOM and MBOM?
Here is a basic breakdown to get you started:
Your EBOM should contain:
A short description and product hierarchy of your product your product.
Part number and name for every component including revision level and unit of measure.
Procurement flags for every component and sub-assembly involved.
Distinguish between electrical and mechanical designs involved in the product design.
Don’t forget about spare parts and parts included in customer service.
Your MBOM should contain:
The consumables and raw materials used in manufacturing.
Items required to pack and ship the product.
Test and measurement tools required in testing your product.
Specific packaging instructions and compliance regulations listed by product.
In conclusion, make sure both your teams – the one writing your EBOMs and the team that is building your MBOMs work in close coordination.
This ensures your product is designed and manufactured to specification with lesser problems along the way.
Make sure NOT to produce before you’ve completed creating your EBOM and MBOM first.
EBOM → MBOM Lite Checklist
Product hierarchy defined
Part numbers + revision levels + units of measure
Procurement flags (make/buy) for each component & sub-assembly
Electrical vs mechanical split clarified
Compliance-critical parts flagged (safety, EMC, chemistry)
Packaging & label specs listed
Test/measurement tools noted
Incoming inspection points listed
Change-log & data ownership defined
Step 3 — Select Your Manufacturer
Readiness check: Partner chosen, NNN/NDA signed, mold/tool ownership clauses confirmed, component-split map + QA points documented.
This all-important step will either make or break your manufacturing journey or your product’s market success.
We put this as at number 3 here because only once the initial planning is done right can you hope to find a good manufacturer who can help you with cost-effective solutions while keeping your requirements and deadlines intact.
Here’s a basic process to help you find the right manufacturer:
Choosing a manufacturer based on your product’s nature, your budget etc.
The first step in selecting your manufacturer involves choosing your basic manufacturing approach as it relates best with your product.
It is difficult to go into the ins-and-outs of this decision which is based on when you want the product launched, the budget you have for producing your first batch, expected demand, your product’s requirements, what region you are going to manufacture your products from.
Researching your shortlisted manufacturers’ background for experience and track record of working with other clients.
You could use resources like Google and LinkedIn to learn about your manufacturer’s presence and history in the market by using the following terms in your search:
“Manufacturer’s Name + Scam” – “Manufacturer’s Name + Review” – “Manufacturer’s Name + Complaint”
Apart from these search terms, a mandatory exposé to the factory’s past work and the quality of projects handled should be enough to make an informed decision when shortlisting and finalizing your manufacturing partner.
Having firefighting plans
Do they provide part replacements easily?
Do they have a legacy and network of suppliers required to deliver ALL your components and contain fallout should there be a supply chain shock?
What about risk management when it comes to disasters and natural events.
Searching for social proof and referrals
Ask for references from current and past clients whom you can cross-check with.
Factory Audit Mini-Checklist
Capacity vs your MOQ & timeline
Tooling ownership clauses & NNN/NDA
Incoming QC → in-process QA → final QC flow
Component traceability (lot codes, COAs)
Past 12-month yield + top 3 defect modes
Approved supplier list & substitution rules
Contingency plan (power, labor, supply shocks)
Step 4 — Tooling plan (mold-flow & materials)
Readiness check: Tool DFM signed, steel grade & texture codes chosen, gating/ejectors/vents defined, color master set, PO released.
Change may sound good in theory, but people are creatures of habit. Forcing too much change all of a sudden will create resistance.
Tooling is like that: it’s where all your design changes crash into a hard deadline.
Before you cut steel, lock decisions that are expensive to change later: material grade, surface finish, color master, texture codes, gate positions, ejectors, vents, and draft.
Run mold-flow to predict where warp, sink, and weld lines will show up. Plan for how those affect cosmetics and fit.
If you know you’ll need EDM on a high-gloss surface, plan it now, don’t discover it at T1.
Your goal here isn’t just “get a mold.” It’s to get a mold that produces consistently, at speed, with minimal rework — and a plan from T1 to Pilot to Pre-MP that proves it.
Step 5 — QA/QC system & pilot run
Readiness check: FAI passed, AQL ≤ target, yield ≥ target, CAPA actions closed, QC standard updated.
It’s wrong to assume you will get the perfect design in the first try itself.
It will take constant feedback and improvements to ensure the product meets customer expectations and can actually be made at scale.
That’s what QA and QC are for.
Quality Assurance is your prevention system: the in-process checks that stop defects from happening.
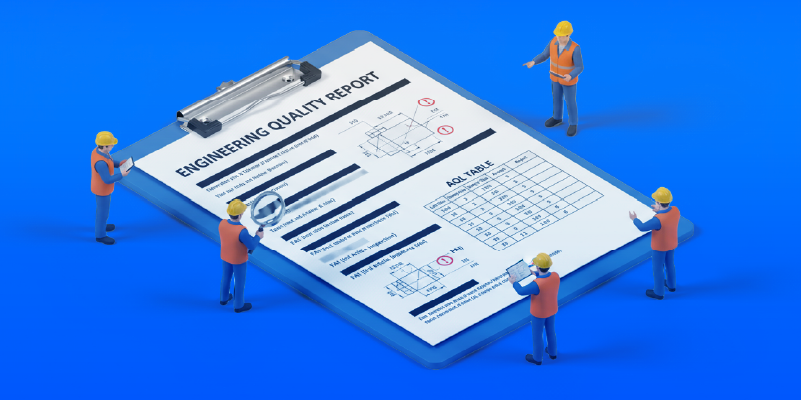
Quality Control is your verification: the checks at defined gates (FAI/AQL) that make sure what came off the line matches what you promised.
Create a QC Standard before you run Pilot. Define how you’ll accept or reject parts: sample sizes, inspection points, measurements, and cosmetic limits. During Pilot, keep a CAPA log (Corrective and Preventive Actions) and fix root causes, not symptoms.
If you wait to think about quality until boxes are packed, you’re too late.
Quality is built. Not inspected in.
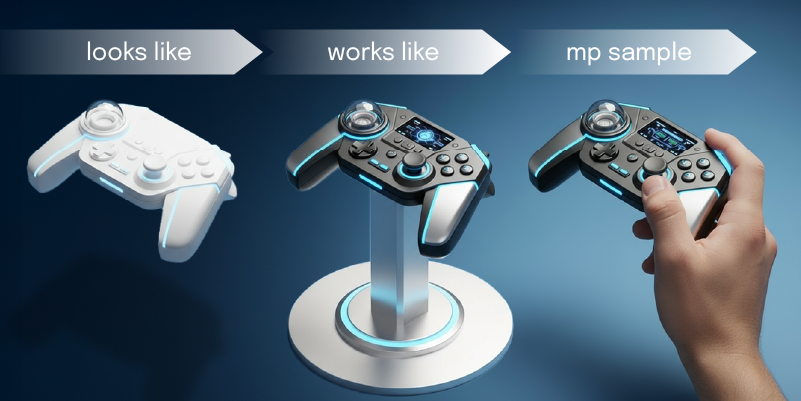
Step 6 — Prototyping
Readiness check: Looks-like & works-like approved, design changes frozen, golden sample tolerances set, test jigs ready.
The prototyping step itself involves 3 stages:
First stage of Prototyping
The first stage of Prototyping generally involves 3D Rendering using tools such as AutoCAD, Solidworks, Autodesk Inventor, etc.
This is the process which allows you to decide and calculate the appearance of your final product by attaching the components involved in their desired location.
The more realistic and detailed your rendering, the better working picture it will give your product design and manufacturing teams versus a conceptual plotted drawing.
Second stage of prototyping
The second stage in prototyping is to create an actual initial prototype so you can go over it with a fine-toothed comb and decide on revisions. Remember, this prototype will not be perfect by any means.
It is something for you to go over and decide if it works, to help you see how your final product will look like and if the quality, working, and appearances fit your needs.
Some of the techniques available for rapid prototyping include 3D Printing, CNC, composite mold etc.
Again, this stage is only for you to see iterations of your design and whether or not your product parts fit together and work as intended.
It will help you save time and money on design and testing versus testing with a traditional prototype.
If you are looking to crowdfund your product idea, you can use this prototype to start raising funds on platforms such as Kickstarter.
Depending on who you are working with and the kind of product you are manufacturing, this stage can take anywhere between 2 weeks to 3 months.
You can play with your product design and suggest improvements in this stage.
Last stage in prototyping
The Last Stage in Prototyping involves producing a Mass Production sample.
This is where you have gone over the product in detail and are ready to get the final sample done in order to see how the final mass produced item will look.
You won’t be able to make big changes to this sample, so be sure to get the improvements done in the earlier stage before you start this prototyping stage.
This stage can take anywhere between 2 weeks to 12 months depending on what kind of product you are manufacturing, how complex it is to manufacture it, your manufacturer, and so on.
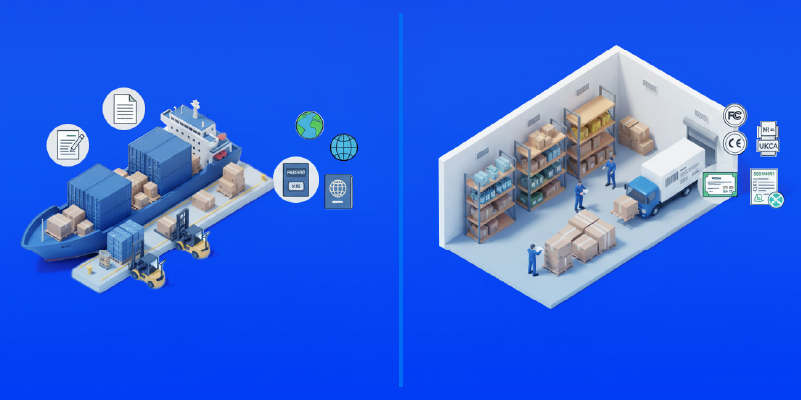
Step 7 — Logistics
Readiness check: Carton/pallet/labels approved, compliance docs (FCC/CE/UKCA) attached, 3PL booked, customs paperwork + HS codes verified.
You have designed, prototyped, and manufactured a great product.
Now, how do you handle the shipping, deliveries, customs, and logistics?
Generally, your manufacturer may have their own shipping policies.
When we’re manufacturing in China, since it’s a different land with its own unique policies and challenges, the supply chain to and from China, too, has its own unique challenges.
Here’s a simple 4-step process to succeed in establishing your own supply chain from China.
Qualify based on your supplier’s background and track record. A courier service like FedEx International will likely have higher rates compared to your manufacturer’s shipping rates.
Put in the time and effort to go over every little detail involved in fulfilling your orders right down to having the product in your hands; don’t take any detail for granted. Duties, tariffs, and other taxes are not included in the shipping costs. The rates change according to the type of your product and the quantity you are importing.
It’s important to have a China-specific strategy when developing your supply chain. You have the option to manage the freight process by either taking full control of your freight, or working with a U.S or a Chinese Freight Forwarder. Each of the options comes with its own advantages and disadvantages. It’s also very important to know the liabilities and responsibilities involved in loading your goods on the containers, risk of damages and losses, insurance, selecting container options, port handling costs, customs clearance, overland trucking, and so on.
Lastly, it’s a great idea to keep on testing alternative shipping options to save on costs and time. This is the thing you will perfect over time rather than the first attempt.
Frequently Asked Questions for 2026
Q: Can I start with small batches (100–200)?
A: Use prototypes and pilots to validate; per-unit costs are higher. Stable pricing often appears around 1000 units.
Q: Why not collect free quotes first?
A: Quotes without DFM ignore manufacturability risks. A DFM teardown reduces surprises in tooling and early runs.
Q: How do you protect IP in China?
A: Split critical components (CCM), buy key parts direct, and assemble under control with NNN/NDAs and mold ownership clauses.
Q: What files help you move fastest?
A: CAD (STEP/IGES), annotated drawings with tolerances, preliminary BOM/PCB where relevant, target price, quantities, and markets.
How Morpho can help you with the next steps
If this 7-step map resonates, Morpho can be your operator through it.
We use the Components Control Method to break complex hardware into manageable parts - protecting IP, keeping quality predictable, and moving from DFM to pilot to launch without quote-first traps.
Book a free 30-minute discovery call. We’ll listen to your product goals and constraints, understand where you are in the steps, and walk you through how our process works across DFM, component control, tooling, QA/QC, compliance, and logistics - plus what onboarding looks like if you choose to proceed.
No pressure, no homework on that call. Just clarity on whether we’re the right partner and how we’d navigate your next phase together.
We only onboard 10 projects per month, so if you want to start manufacturing your product as soon as possible, grab a slot for your discovery call.


